Legend Studio Tutorial
Create a workspace
Start working on your data model by creating a workspace. A workspace is a copy of a project which can be later merged back into the main project. It represents a branch in the underlying GitLab project. To create a workspace:
-
Select an existing (GitLab) project or select + to start working on a new one. Please note that the FINOS hosted version of Legend Studio does not support creating a new project at this time.
-
Create a workspace.
-
Click Next.
Create a group workspace
-
Follow steps above to create a workspace
-
Check the Group Workspace check box.
Access Text Mode
[TODO: add screenshot]
To access or exit Text mode: Press F8 or the hacker icon on the bottom right corner of your scrreen. The bar should change when you open or close Text mode.
To compile your code: Press F9
Create a data model
Create a model diagram
COMING SOON
Use a diagram to create a data model
COMING SOON
Define a new model package
Create a package to start defining model hierarchies to group models into logical concepts.
- Click the + icon next on the top left corner to add a new Element.
- Click New package to start a model hierarchy. Let's call this package demo.
Define a data model hierarchy
COMING SOON
Edit project overview
COMING SOON
Create a class, enumeration or profile
To create a class, enumeration or profile:
- Right-click any package on the left side of the panel, or click the
+near the name of your project. - Under
Class view, you'll see a list of class forms as well as a diagram view of your class. You can add tags, stereotypes, properties, constraints, qualified properties, and super types to your model.
Define a new class
-
Click the + icon (make sure your demo package is selected).
-
Click New Class.
Let's create 2 classes. One that is called
Personand another one that is calledFirm.Studio displays a visualization of the class and a tabbed list of the possible model enrichments.
Add a property primitive data type
-
Select the
PersonandFirmclass respectively. -
Go to the Properties tab and click the + icon.
-
Type in the name of your property and specify the data type and cardinality.
For our
Personclass, let's create a property calledfirstNameof typeStringwith cardinality of 1. Let's add the propertyidof typeStringwith the cardinality of 1 in ourFirmclass.
Add a derived property
-
Select the
Personclass. -
Go to the Derived Properties tab and click the + icon.
-
Type in the name of your property and specify the data type and cardinality.
-
Type in the expression.
Let's add a derived property called
firstNameCountusing the following expression:$this.firstName->count(). -
Select a return data type of
Integerand cardinality of 1. -
Press F9 to compile the expression.
Add a constraint
-
Select the
Personclass. -
Go to the Constraints tab and click the + icon.
-
Type in a name for the constraint and the expression.
Let's add a constraint called
firstNameNotEmptyusing the following expression:$this.firstName->isNotEmpty(). -
Press F9 to compile the expression.
Add a quality control to a property
Type as a quality control
COMING SOON
Multiplicity as a quality control
COMING SOON
Enumeration as a quality control
COMING SOON
Constraints as a quality control
COMING SOON
Model constraint feedback
When typing constraints and qualified properties, you'll get immediate parsing feedback. You can compile your code by pressing F9.
ADD SCREENSHOT
Create a Profile
-
Click the + icon.
-
Click New Profile.
Create a tag in your Profile
Use tagged values to add context to your data model. For example, we can add the tagged value alias to our Firm class to make it easier for others to navigate our data model.
-
In the Profile editor, go to the Tags tab and click the + icon.
-
Type in
alias.
Add a tagged value to a class
-
Select the
Firmclass -
Go to the Tagged Values tab
-
Drag and drop the Profile element into the Tagged Value tab OR hit the + icon.
-
Select alias.
-
Type in Organization.
The Firm class now shows the additional context.
Create a stereotype in your Profile
Annotate your model with labels like legacy or deprecated:
-
In the Profile editor, go to the Stereotypes tab and click the + icon.
-
Type in deprecated.
Add a stereotype to a class
-
Select the
Firmclass -
Go to the Stereoptypes tab
-
Drag and drop the Profile element into the Stereotypes tab OR hit the + icon.
-
Select deprecated.
The Firm class now shows the additional metadata information.
Create and add an enumeration
- Click the + icon on the left-hand side and select Add an enumeration.
- Let's create an enumeration called CompanyType with the values LLC and Corporation.
- Let's navigate back to our
Firmclass and add a property named firmType. - Select CompanyType for the property type and a cardinality of 1.
Add a supertype
Let's create a new class called LegalEntity.
-
Moving back to the
Firmclass, go to the Super Types tab and click the + icon. -
Select the
LegalEntityclass from the dropdown.The model visualization on the left now shows the LegalEntity class as a super type of Firm.
Add a property (non-primitive data type)
Create a relationship between the Person and Firm classes.
- Select the
Firmclass, - Create property with the following values:
- Name: employees
- Type: Person
- Cardinality: 0..
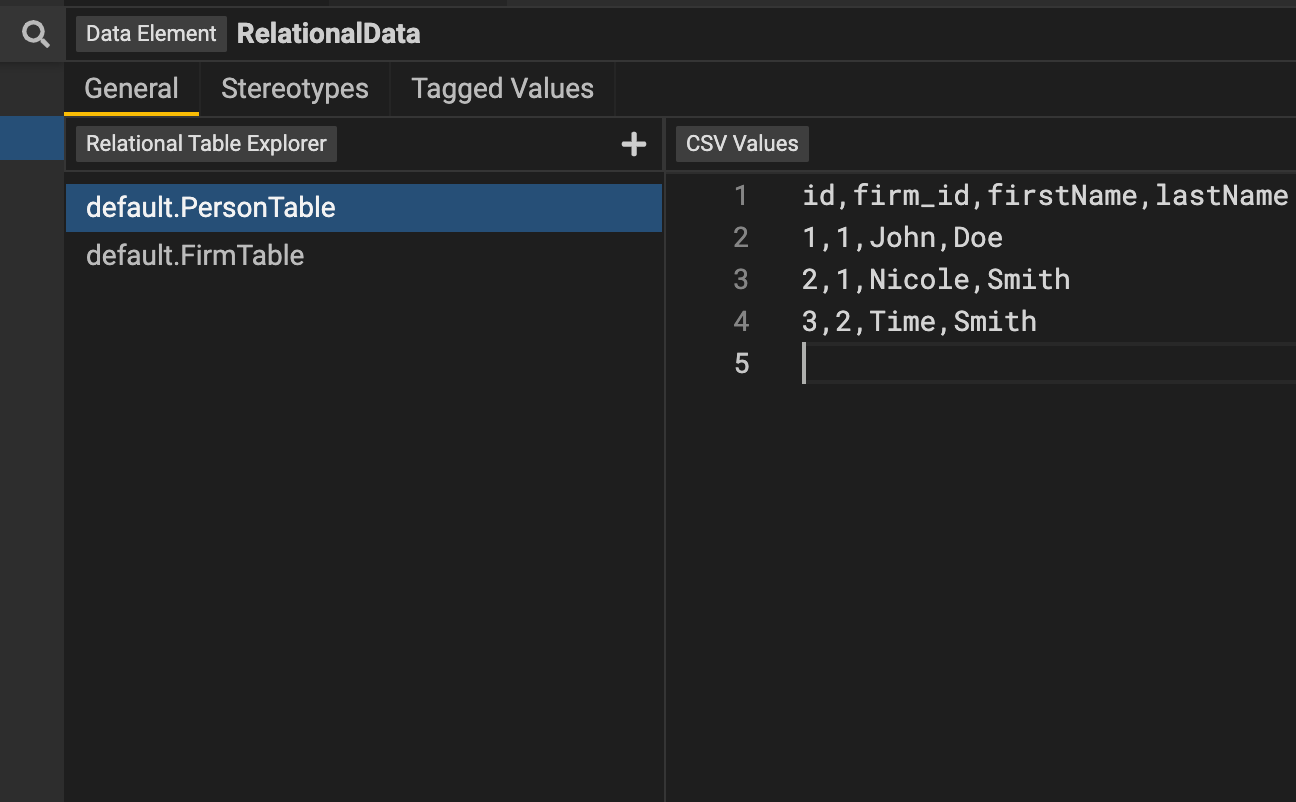
Create a Data Element
Data Elements are top level elements that define test data for store/external formats. They are useful for sharing test data among different tests.
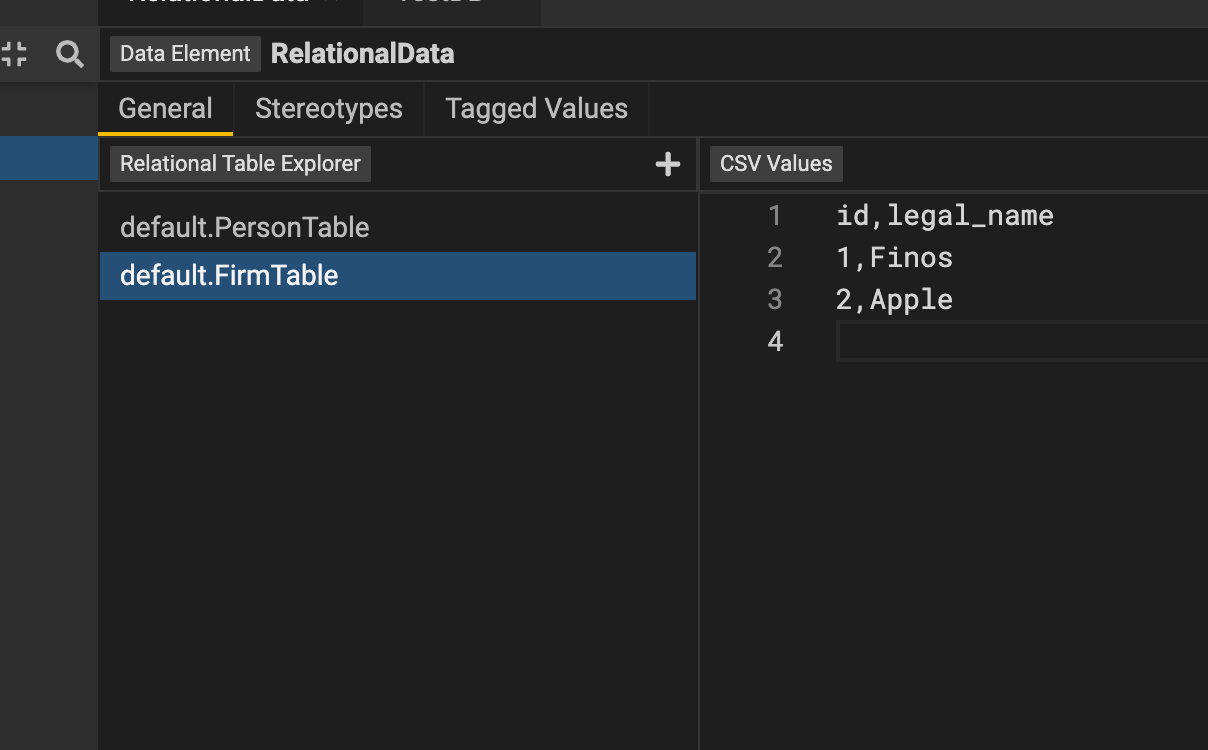
Relational
Test data for relational is defined through csv values for each table, which is to be used when a user is sourcing data from relational databases. The name of the schema, the table, and the related CSV values must all be specified. Besides, the primary keys have to be distinct.
External Format(m2m)
Test data for model to model could be defined through external format. Provide test data for properties of source classes that are being used in the mapping. 
Create a Model-to-Model Mapping
Create a model transformation using model-to-model mappings. Model transformations are used to connect different models.
Create a Mapping between source and target class
Let's start by defining the target class, for which we would like to create the mapping for.
- Create a new class called
NewPerson. - Add a property to
NewPersoncalled name. Make the property a string with a cardinality of 1. - Let's also add a property to our existing
Personclass called lastName. Make the property a string with a cardinality of 1. - Click the + icon and select New Mapping to create a new mapping called NewPersonMapping.
- Drag and drop the NewPerson target class into the Add a mapping element section on the left.
- Hit the create button using the default setting.
Let's define the source class for our mapping and specifiy the transformation.
- Drag and drop the
Personsource class into the choose a source section on the right. - To specify the transformation add the following expression for the name property:
$src.firstName + ' ' + $src.lastName. You can also drag and drop the firstName and lastName properties from thePersonsource class into the function panel.
Add a Mapping Test
It is good practice to add test to any mapping that you specifiy. Let's create one.
- Right click on the
NewPersonclass and select Test. Alternatively, you can click on the + icon in the bottom left panel to add a test.
We now need to create a sample query to test if our model-to-model mapping executes correctly.
- Click on the pencil icon to edit your query.
- Let's create a very simple query. First, let's make sure to select the Graph Fetch option for model-to-model queries. Studio does not currently support Projection queries on top of model-to-model mappings. Let's drag and drop the name property from the explorer panel into the fetch structure panel.
- Hit the Save Query button.
Please refer to our create a query section of the docs for more detailed information about the Query Editor (coming soon!).
Studio is generating sample input data for your defined query. You can also modify it if you want.
- Hit the generate Result icon.
- Congrats! You now have a mapping test and can run it any time to validate the execution of your model-to-model mapping.
Execute a Model-to-Model Mapping
You can also execute a model-to-model mapping directly.
- Right click on the
NewPersonclass and select Execute - Create a sample query by clicking on the pencil icon.
- Drag and drop the name property from the explorer panel into the fetch structure panel.
- Select Check graph fetch
- Hit the Save Query button
- Hit the Execute button to execute the defined query using the auto-generated data from Studio
You can promote this ad hoc execution to a test by clicking on the beaker icon.
Execute a Model-to-Model Mapping with Constraints
Remember that we can add a constraint on classes? We can can also execute model-to-model mappings with constraints to check if the constraint criteria are violated.
Let's create a constraint on the NewPerson class that checksq if the name value is empty $this.name-> == ''
- Right click on the
NewPersonclass and select Execute - Create a sample query by clicking on the pencil icon
- Drag and drop the name property from the explorer panel into the fetch structure panel
- Select Check graph fetch
- Hit the Save Query button
- Let's remove the firstName test data to intentionally violate the constraint criteria that we specified on our
NewPersonclass - Hit the Execute button to execute the defined query
Studio will show a defect with the details about the violated constraint. Constraints can be both on source and target class.
Connect Data to a Data Model
Connect data to a data model to start querying data leveraging the business-friendly terms and data relationships defined in the data model.
Create a Relational Database
Define the schema definition of the relational database you wish to connect to the data model.
- Hit the + icon.
- Select New Relational Database
- Enter the name of the Database, for example H2DemoDataBase
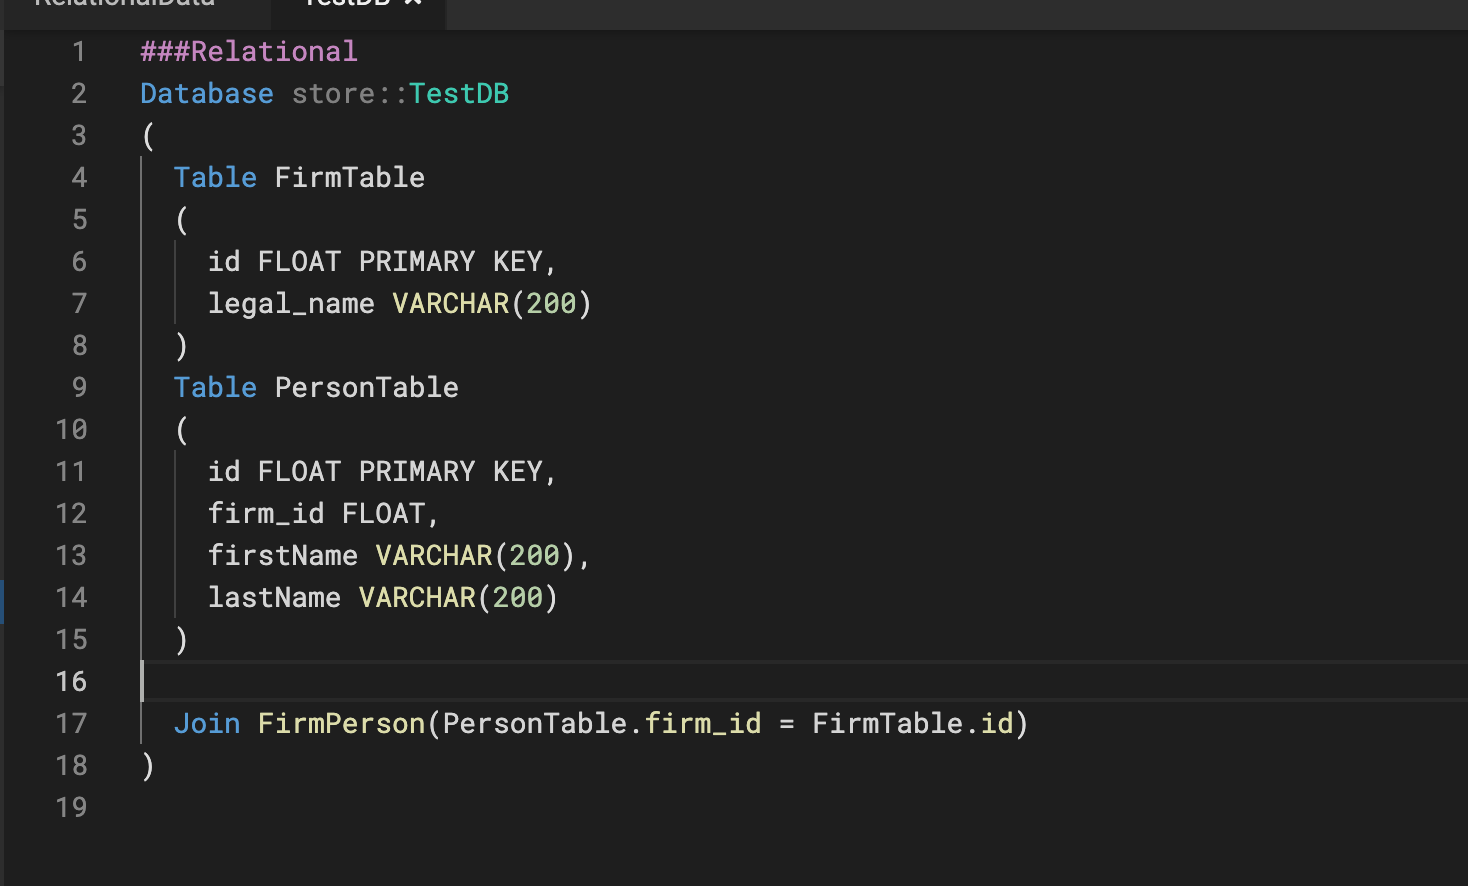
The Studio form mode currently does not support defining the Relational Database schema. Please select Edit in text mode to continue.
- Define the database by adding tables, columns and joins.
Please refer to below sample SQL snippet to set up a in-memory H2 demo database.
###Relational Database demo::H2DemoDataBase ( Table FirmTable ( id INTEGER PRIMARY KEY, legal_name VARCHAR(200) ) Table EmployeeTable ( id INTEGER PRIMARY KEY, firm_id INTEGER, full_name VARCHAR(200), country_id INTEGER ) Table CountryTable ( id INTEGER PRIMARY KEY, country_name VARCHAR(200) )
Join FirmEmployee(EmployeeTable.firm_id = FirmTable.id) Join EmployeeCountry(EmployeeTable.country_id = CountryTable.id) )
Create a Relational Mapping
Map the columns of your relational tables to the properties defined in the data model.
Define the Relational Mapping
- Hit the + icon.
- Select New Mapping
- Enter the name of the Mapping, for example DemoRelationalMapping
- Define the mapping target: Drag a class into the editor where it says Add a mapping element, for example the
Firmclass. Then select Create. - Define the mapping source: Drag the H2DemoDataBase Relational Database in the editor where it says Choose a source.
- Choose the table specified in the Relational Database schema that contains the columns you wish to map to your data model properties. Let's choose the FirmTable.
- Map the column names on the left-hand side to the property names in the center of the editor screen. Let's map the legal_name column to the legalName property.
Execute the Relational Mapping
To ensure that the mapping has been done correctly and the desired data is actually returned, let's execute the relational mapping.
- Right click on the class you wish to test execution for. Let's aim to query Firm data by right-clicking on the
Firmclass and selecting Execute. - Hit the Edit Query button to define your test query.
- Create test data either from SQL or csv.
- Hit the Execute button to test execution.
Create Relational Mapping Test
It is good practice to define tests for each of your relational mappings. That way, changes to the model and mappings can be performed more safely.
- Right click on the class you wish to set up the test for. Let's set up a test for the
Firmclass by right-clicking on it and selecting Test. - Alternatively, you can select the + icon where it says Let's add some tests!. Select the class from the dropdown you wish to create the test for.
- Hit the Edit Query button to define your test query.
- Create test data either from SQL or csv.
- Hit the Execute button to test execution.
You can test all the queries and relational mappings at once by hitting the Run All Tests button.
Create a Connection
Define the Connection details between the relational database and the data model.
- Hit the + icon.
- Select New Connection
- Enter the name of the Connection, for example H2DemoConnection
- Select Relational Model Connection
Start entering the Connection details in the General tab. First, choose the Database type.
Database type
Specify the type of relational database you wish to connect to. Studio currently supports:
- H2 (in-memory test database)
- Snowflake
- BigQuery
Datasource
Specify the connection details of your selected database type.
H2
To execute against an in-memory H2 test data base, you would need to define test data by adding SQL to Test data setup SQL
H2 Embedded
Coming soon
Static
More details coming soon
Specify Static connection details by adding the below details.
- Host
- port
- Database
Snowflake
More details coming soon
Specify Snowflake connection details by adding the below details.
- Account
- Region
- Warehouse
- Database
- Cloud type
BigQuery
More details coming soon
Specify BigQuery connection details by adding the below details.
- Project id
- Default dataset
Authentication
Define how access to the database should be authenticated in the Authentication specifications.
H2 Default
No further input needed if you select the H2 Default authentication specifications.
Delegated Kerberos
More details coming soon
Specify Delegated Kerberos authentication details by adding the below details.
- Server principal
Snowflake Public
More details coming soon
Specify Snowflake authentication details by adding the below details.
- Private key vault reference
- Pass phrase vault reference
- Public user name
Gcp Application Default Credentials
More details coming soon
Specify GCP authentication details.
Username password
More details coming soon
Specify Username password authentication details.
Create a Runtime
The combination of the relational mapping and the connection details are specified in the Runtime.
- Hit the + icon.
- Select New Runtime
- Enter the name of the Connection, for example H2DemoRuntime
- Select the relational mapping you want to specify for your runtime, for example DemoRelationalMapping
Execute Model-to-Model Mapping
Legend provides an execution feature to run queries, constraints, and model-to-model/model-to-database transformations. Use live data (pulled from physical data stores) or generated sample data as inputs to the executions and review the results to test your model as you build it.
You can save these tests and continue to enhance your data models with the comfort that your changes can be tested against expected results.
Steps to execute a model-to-model mapping
-
Drag the Execute panel up from the bottom of Studio screen.
-
Select the edit button to select the
NewPersonclass for testing. Then select the attribute(s) to test. The source model is auto-populated. -
Execute the mapping and review the results.
-
Save this exection as a test to run as part of the pipeline.

Create a Service
Build services on top of data queries to consume modeled data systematically. To create a service select New Service from the drop down menu to launch the Service Editor.
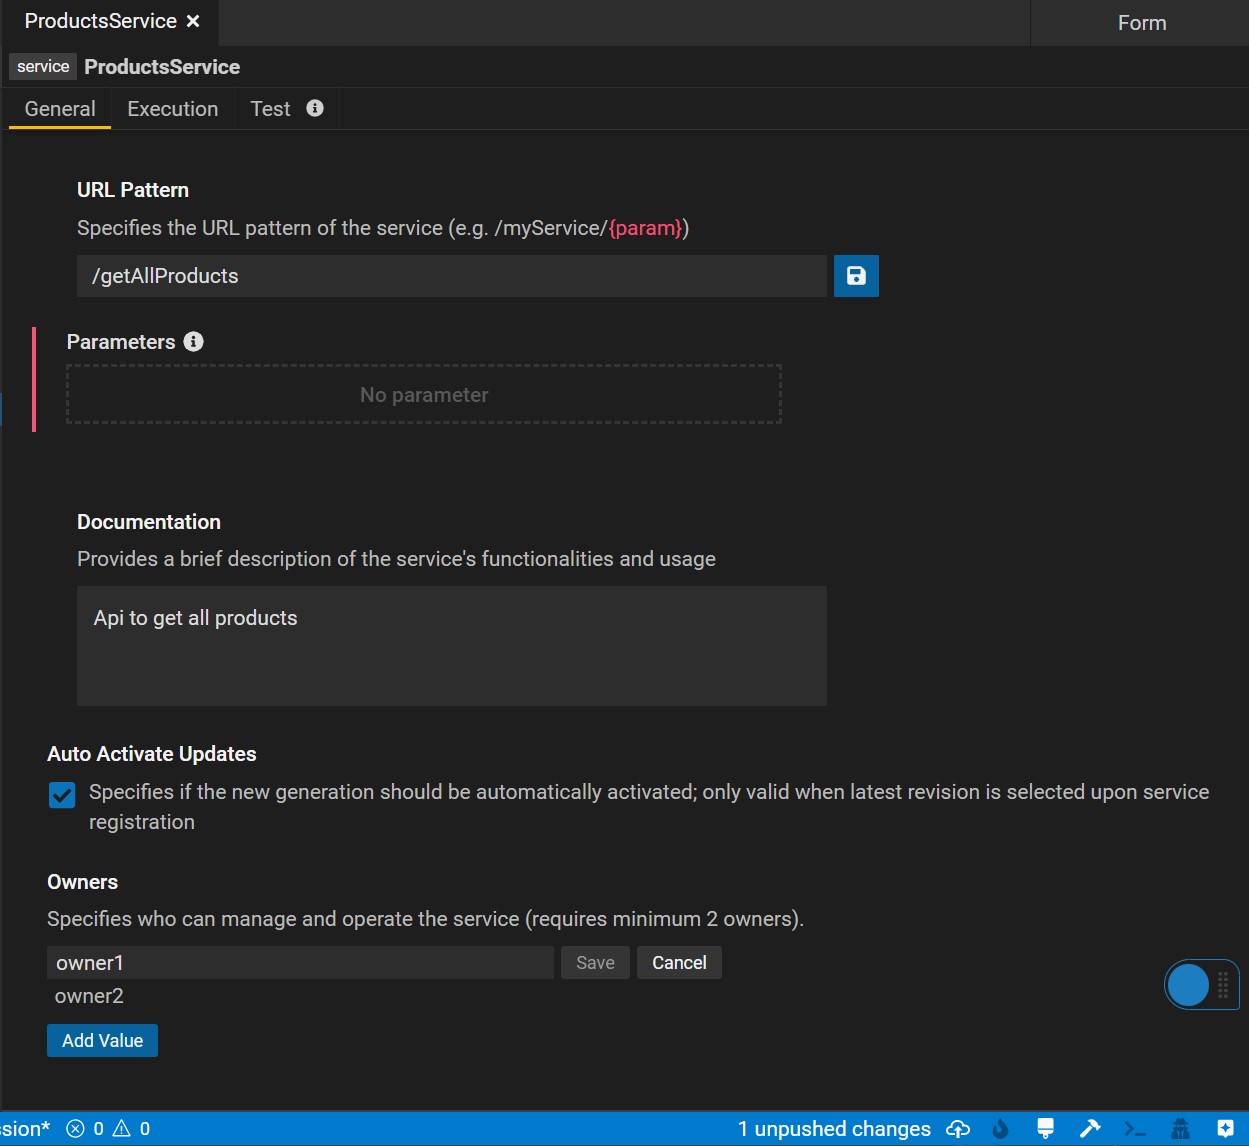
General Tab
In the General tab of the Service Editor, users can specify metadata of their service including the service URL, documentation and owners. URL parameters can be directly defined within the {"{"}{"}"} sytnax.
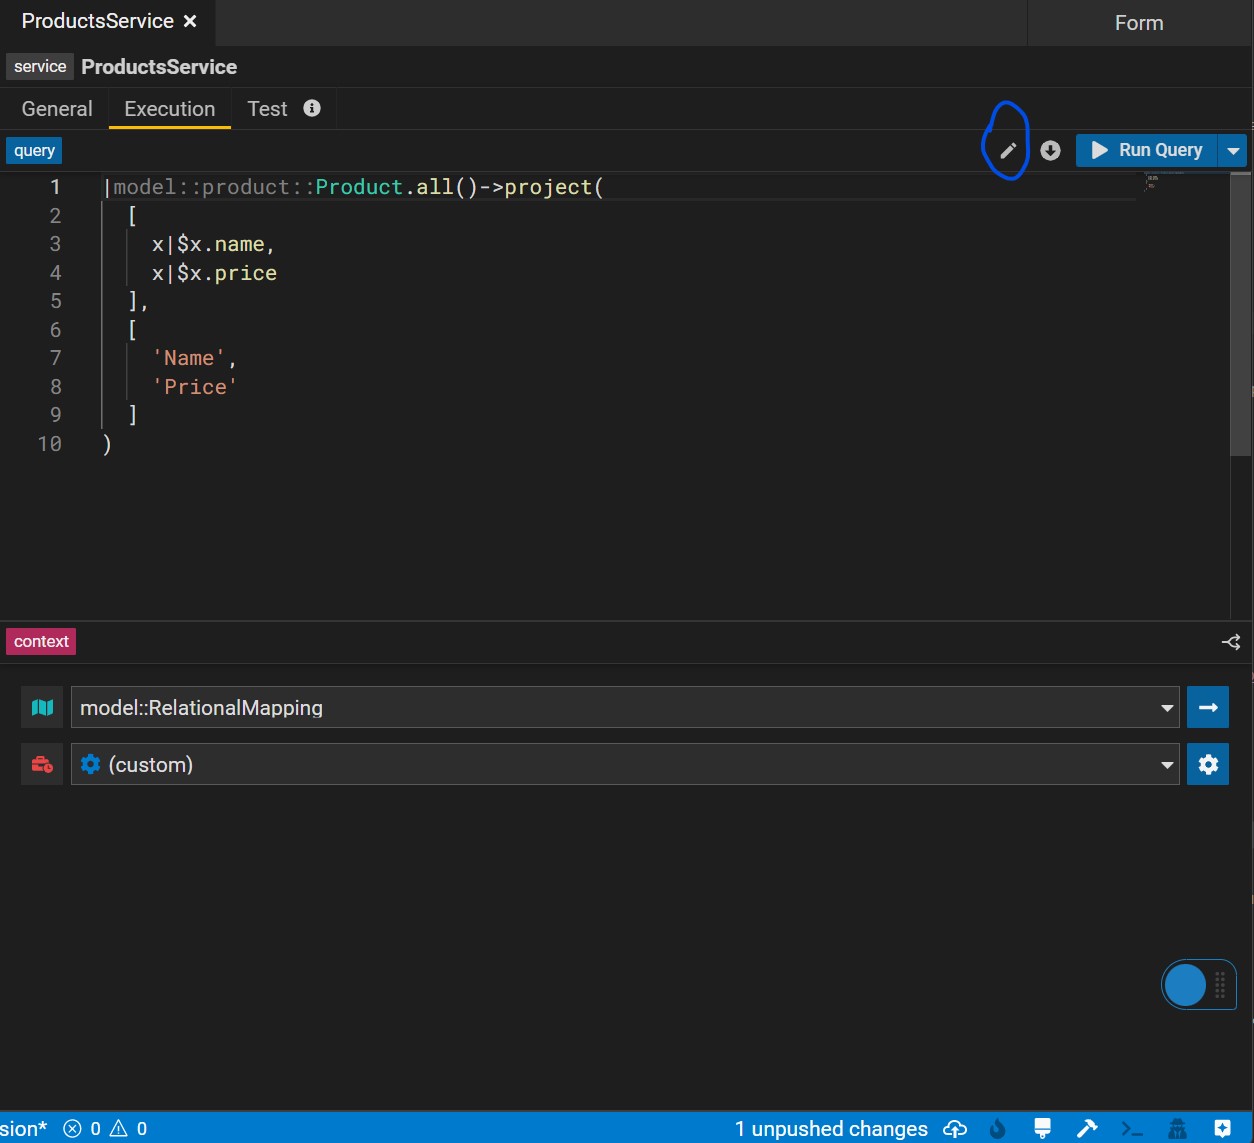
Execution Tab
In the execution tab, users can create and edit their service query. By hitting the pencil icon button, users can edit the query using the Query Builder. Users can make changes to the query either in the user-friendly form mode or in text mode.
Additonally the bottom panel lets you define your execution context which represents the mapping and runtime used when executing your query,
Multi Executions lets you use a service parameter to decide what execution context (mapping, runtime) to use. You can switch between multi and single using the top right icon on the context panel.
Tests Tab
This panel lets you define tests for the services you write by specifying test data, serialization format of your test and the assertions.
See features in action
Create a Service
Create a multi execution service
Create a Service Test
Create connection test data
Click the generate button to automatically generate test data if possible. Otherwise, please manually create test data.
Relational
Add relational data tables based on databases to which the service's mapping connects.
It's unnecessary to provide all columns with test data.
The columns used in the service, however, require test data. Besides, the primary keys have to be distinct.
External Format (M2M)
Click the generate button to automatically generate test data if possible. Otherwise, kindly manually provide test data for the source class's properties that serve as
the foundation for the properties used in the service. e.g. As shown in the video, _Firm's name is used in the service, which comes from Firm's legalName. Therefore, manually providing test data for legalName will be sufficient if the generate button is not working.
Data element
More examples of different types of Data element creation could be found here.
Service Store
Relational
Model to Model
Service Store
With Data Element
With Parameters
Promote a model-to-model mapping query to a service
-
Create a model-to-model mapping (find instructions here) and select the Promote to Service icon.
-
Add a name for the service and hit create to launch the Service Editor.
Promote a relational-to-model query to a service
This feature is not yet supported.
Consume a Service
Consume data services via executable service JAR files. As part of the project build, an executable JAR file is generated for each service defined in the project. The executable service JAR file will be published in the Gitlab project that stores the data model code. The JAR file can be consumed by any Java application.
Creating and Consuming a service execution JAR file
Create and locate a JAR file
See below steps how to create and locate an executable JAR file for consumption in Studio.
-
Create a data service. Find instructions here.
-
Sync workspace.
-
Navigate to Workflow Builds.
-
Wait for the build to complete successfully.
-
Expand the generated workflow build to view the workflow details and click on verify snapshot to open the associated Gitlab pipeline.
-
In Gitlab, click on Browse under the Job artifacts.
-
Click on artifacts.
-
Locate the execution jar file and download it.
Deploy JAR file
The executable JAR file can be used as a dependency to execute your service.
List the JAR file as a dependency in the Java application. For production use cases, the recommendation is to fetch the JAR file from a published repository (such as the public Maven repo).
See features in action
Create a Flat Data Schema
-
Click the + on the left-hand side and select New SchemaSet.
-
Enter a name for the SchemaSet
-
Ensure the type (top left) is selected as FlatData
-
Click the + next to the type to add a schema. For FlatData only a single schema should be added to a SchemaSet.
-
For FlatData the Id and Location can be left blank
-
Define the format of the file by entering the Flat Data Grammar
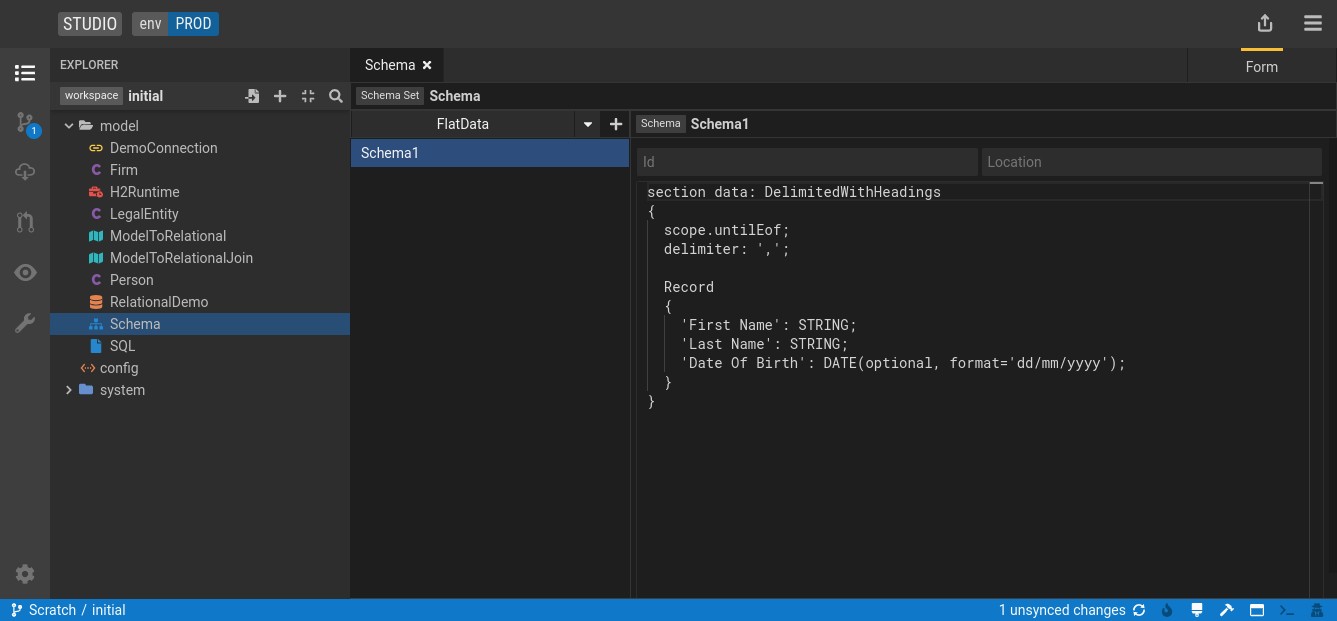
Flat Data Grammar
Sections
Each file format is defined by a schema (a single entry in a Legend SchemaSet). Each schema consists of one or more sections. A section is defined in grammar as:
section section_name: driver_type
{
  properties
  record_definition
}
The section_name provides a name for the section and must be unique within a schema.
The driver_type defines the type of data contained in the section. See below for details of the core driver types available.
The properties are specific to the driver type and are detailed below. Each property is specified either as a name or as a name and value. Each
property specified is terminated by a semicolon (;). See example below.
A record_definition may be given for driver types that support one.
Record definitions
A record definition is specified as:
Record
{
  record_fields
}
Where a record_field is:
field_name: data_type(arguments)
or
field_name {address}: data_type(arguments)
dependent on whether the driver type is self-describing (without address) or not (with address).
The field_name is the field's name. For self-describing drivers this will be the name of the field exactly as it appears in the file (for example the heading of the
column). If the field_name contains non-alphanumeric characters (other than underscores) it should be enclosed in single quotes (''). For drivers that
are not self-describing the field_name can be any name that is unique within a record type. The address then specifies how the field is identified
within the data. The address is thus driver specific, it is always given within braces ({}).
Data Types
The valid data_types are given below. All data types can take arguments; when none are used the parentheses (()) are omitted. Arguments consist of
the single word optional or are a specified as argument=value. Multiple arguments are comma (,) separated.
STRING
Allowable Options:
optional
Examples:
STRINGSTRING(optional)
BOOLEAN
Allowable Options:
optionaltrueStringfalseString
Examples:
BOOLEANBOOLEAN(optional, trueString='Yes')BOOLEAN(trueString='Y',falseString='N')
Notes:
- If no
trueStringorfalseStringis specified thentrue(case insensitive) is taken to be true and any other value is considered false. - If only a
trueStringis specified then its value (case insensitive) is taken to be true and any other value is considered false. - If only a
falseStringis specified then its value (case insensitive) is taken to be false and any other value is considered true. - If both a
trueStringand afalseStringare specified their values (case insensitive) are taken to be true/false respectively and any other value is considered an error. - The properties
defaultTrueStringanddefaultFalseStringcan be used to specify behaviour for all BOOLEAN fields in a section.
INTEGER
Allowable Options:
optionalformat
Examples
INTEGERINTEGER(optional, format='#,##0')
Notes:
- Valid format strings are per Java's DecimalFormat (as used for integer-only strings).
- The format for all
INTEGERfields in a section can be specified using the defaultIntegerFormat property.
DECIMAL
Allowable Options:
optionalformat
Examples
DECIMALDECIMAL(optional, format='#,##0.0')
Notes:
- Valid format strings are per Java's DecimalFormat (as used for integer-only strings).
- The format for all
DECIMALfields in a section can be specified using the defaultDecimalFormat property.
DATE
Allowable Options:
optionalformat
Examples
DATEDATE(optional, format='dd/MM/yyyy')
Notes:
- Valid format strings are per Java's DateTimeFormatter (as used for date-only strings).
- The format for all
DATEfields in a section can be specified using thedefaultDateFormatproperty. - If a format is not specified, dates are expected to be in ISO 8601 format for dates only (
yyyy-MM-dd).
DATETIME
Allowable Options:
optionalformattimeZone
Examples
DATETIMEDATETIME(optional, format='dd/MM/yyyy HH:mm')DATETIME(timeZone='EST')
Notes:
- Valid format strings are per Java's DateTimeFormatter.
- The format for all
DATETIMEfields in a section can be specified using thedefaultDateTimeFormatproperty. - If a format is not specified, datetimes are expected to be in ISO 8601 format.
- If the datetime data does not include time zone information the time zone will be set according to the arguments/properties specified.
- Valid timeZone values are per Java's ZoneId including SHORT_IDS.
- The default time zone for all
DATETIMEfields in a section can be specified using thedefaultTimeZoneproperty. - When no time zone information is specified it is assumes to be UTC.
Driver: DelimitedWithHeadings
This driver reads data rows in which columns of data are separated by a delimiter. The first row specifies the headings for each column and hence defines the order of data. A classic CSV file is an example of this.
Properties
- Common Streaming Properties.
- Common Delimited Properties.
- Common Data Properties.
modelledColumnsMustBePresentoptional property which can be added as an option to assert that all fields specified in the Record must be present in the column headings row regardless of whether the field is optional.onlyModelledColumnsAllowedoptional property which can be added as an option to prohibit any fields not specified in the Record from being present in the column headings row.
Record
A Record definition is expected for this driver and its fields must not specify address values.
Driver: DelimitedWithoutHeadings
This driver reads data rows in which columns of data are separated by a delimiter and where no headings row is present.
Properties
Record
A Record definition is expected for this driver and its fields must specify address values.
The addresses are the one-based column positions of the data within the file.
Driver: ImmaterialLines
This driver is used to skip unnecessary lines of data.
Properties
Record
A Record definition must not be specified.
Common Delimited Properties
-
delimitermandatory property which specifies the column separator character(s). -
quoteCharoptional property which defines the character used for quoting strings within the file rows so that they can include delimiters and/or ends-of-lines.When quoting is used a quote character within a quoted string can be escaped by repeating it (for example the text 'It''s OK', where
quoteChar: '\'';has been specified, equates to the value It's OK). -
escapingCharoptional property which defines the character used to escape other characters. Escaping can be used both within and outside quoted text.Inside a quoted string the above example could have been
'It\'s OK', wherequoteChar: \'';andescapingChar: '\\'; have been specified, also equates to the value It's OK.Outside it can be used to escape delimiters such that the text
Hello\, World, Goodbye, wheredelimiter: ',';andescapingChar: '\\';have been specified, equates to two column values ofHello, WorldandGoodbye. -
nullString- optional property defining the text which equates to a null (missing) value. When this property is not specified the value is considered to be always present thus two delimiters in succession is interpreted as an empty string. To treat that as a null value you need to specifynullString: '';.Multiple
nullStringproperties can be used to specify more that one value.
Common Streaming Properties
-
recordSeparatoroptional property that defines the character(s) used to separate records within the file. This is commonly the end-of-line character(s).If this option is not specified the file will be separated using any of the commonly used line endings (
\n,\r\nand\r); this is usually the best option to alleviate issues with data being copied between different computers with different operating systems. -
mayContainBlankLinesoptional property which can be added as an option to specify that blank lines within the file should be ignored. -
scoperequired property that specifies the scope of the section. Options are:scope.default;use this unless you want a specific alternativescope.forNumberOfLines = n;if the section spans an exact number of linesscope.untilLineEquals = 'END';if the section spans until a marker line of the specified textscope.untilEof;if the section spans for the remainder of the data
Common Data Properties
defaultIntegerFormatdefaultDecimalFormatdefaultTrueStringdefaultFalseStringdefaultDateFormatdefaultDateTimeFormatdefaultTimeZone
See Data Types for usage.
Examples
This example defines a CSV file with:
- an ignored header row
- a column headings row
- data rows
section header: ImmaterialLines
{
  scope.forNumberOfLines: 1;
}

section data: DelimitedWithHeadings
{
  scope.default;
  delimiter: ',';
  modelledColumnsMustBePresent;
  onlyModelledColumnsAllowed;

  Record
  {
    'First Name': STRING;
    'Last Name': STRING;
    Age: INTEGER(optional);
  }
}
This example defines a pipe-delimited file without headers. Columns are therefore addressed positionally:
section data: DelimitedWithoutHeadings
{
  scope.default;
  delimiter: '|';

  Record
  {
    FirstName {1}: STRING;
    LastName {2}: STRING;
    Age {3}: INTEGER(optional);
  }
}
Review and Commit Changes
Legend is integrated with the software development lifecycle (SDLC) supported by GitLab, which lets you review and commit changes.
Follow these steps to review and commit a change.
-
Press
Ctrl+Sto sync the local changes to the workspace.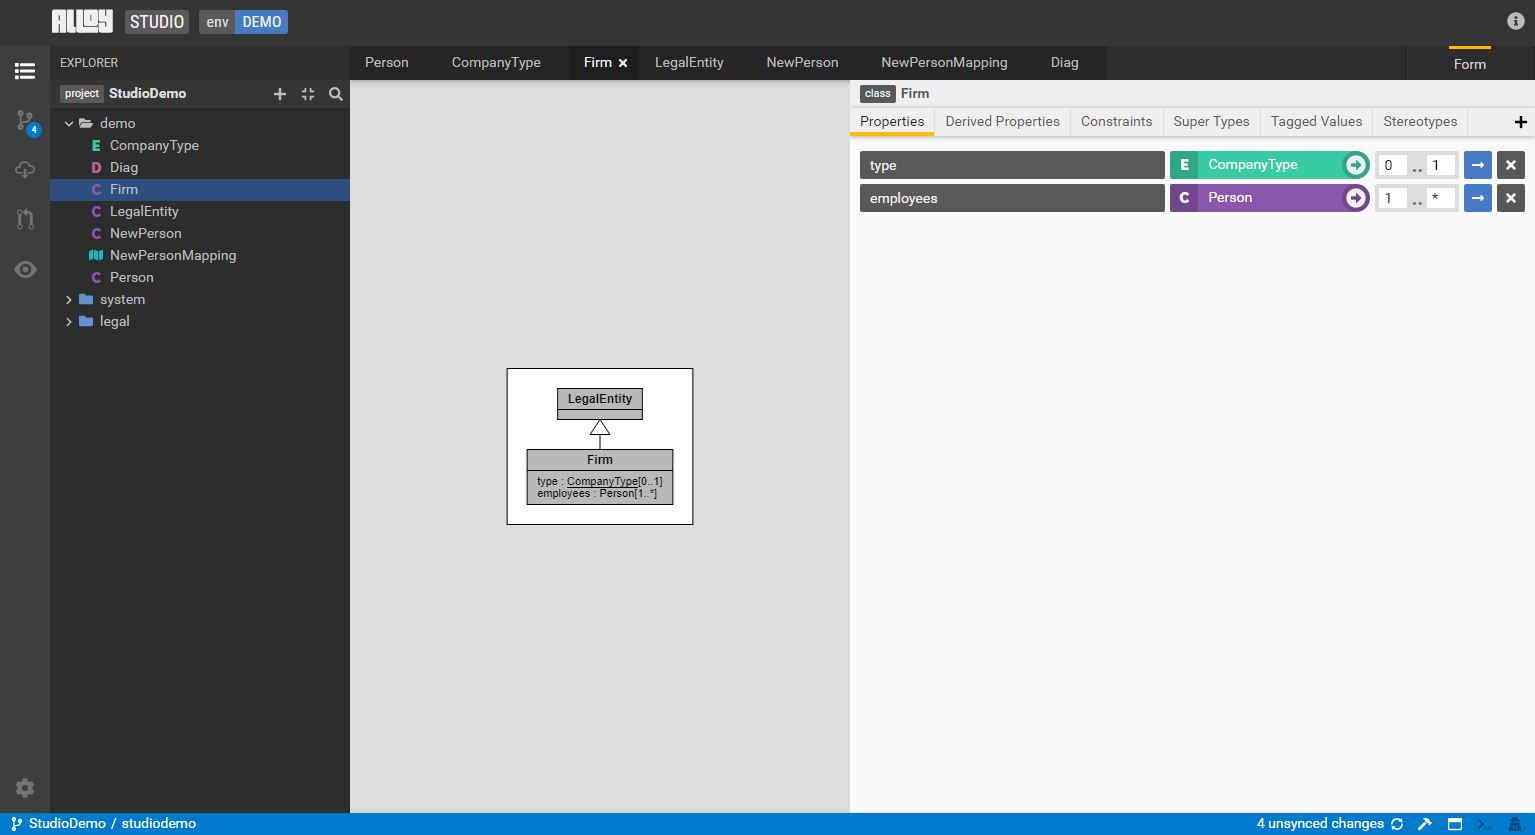
-
Select the diff view to review the synced changes in workspace.
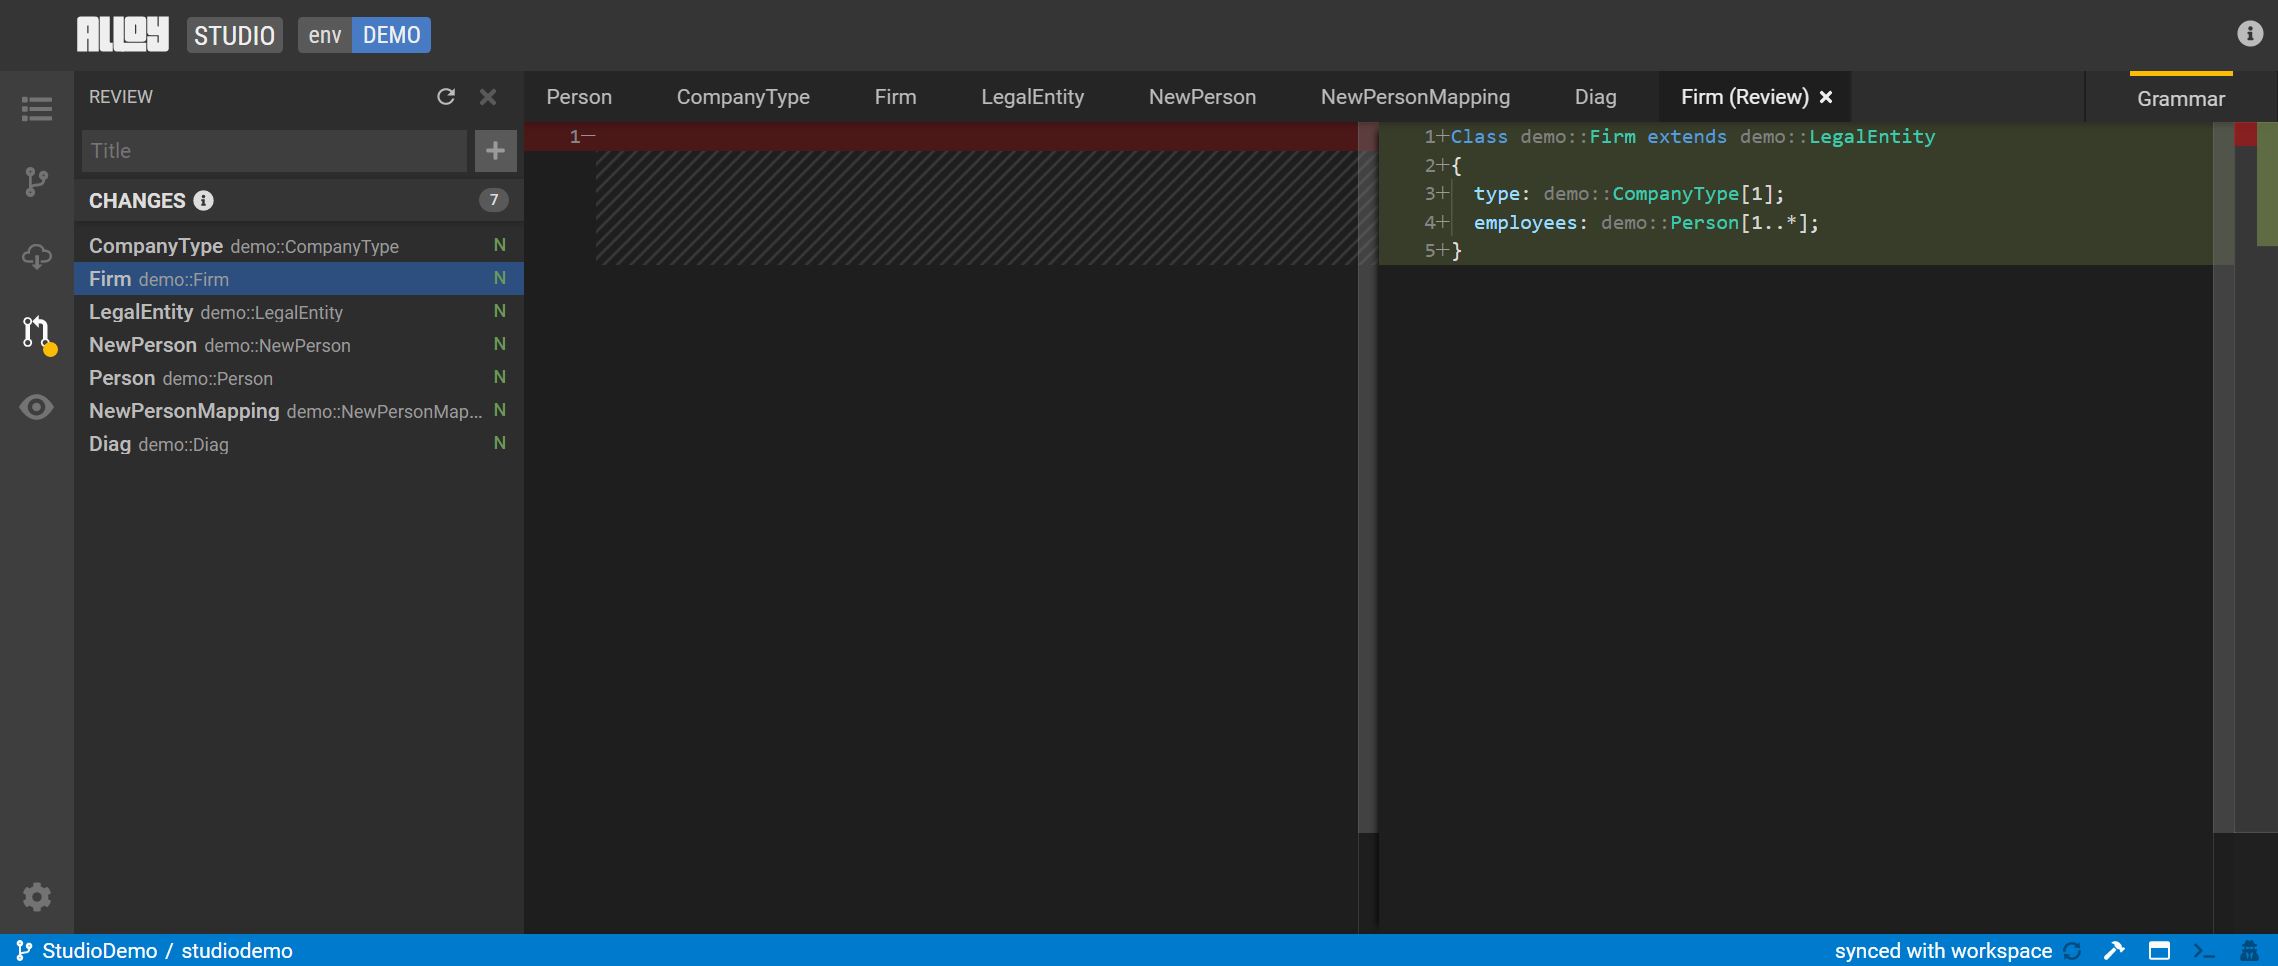
-
To create a review, click the highlighted icon in the activity bar or press
Ctrl + Shift + Mto go to the review panel. Here you can review the code in the current workspace vs. the committed code.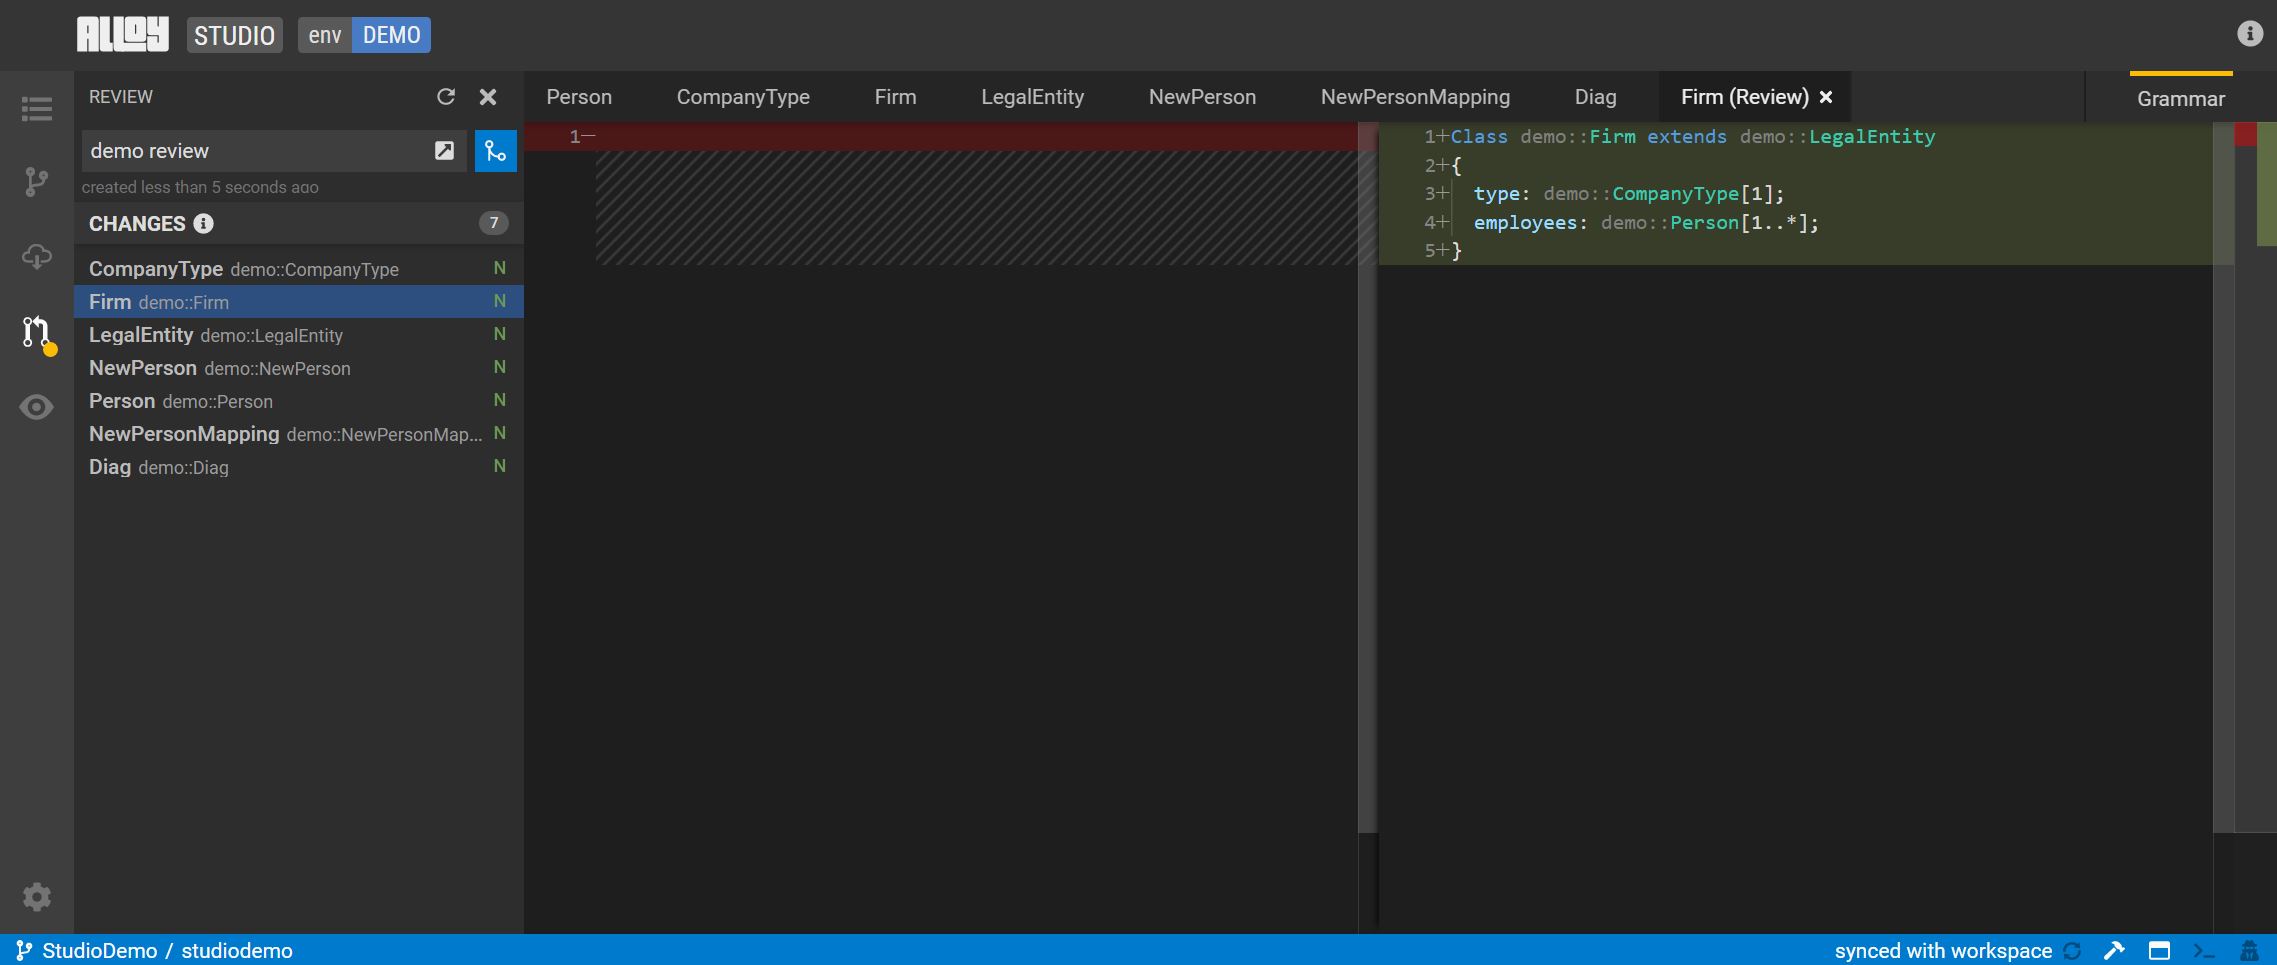
-
After the review is approved, click Commit.

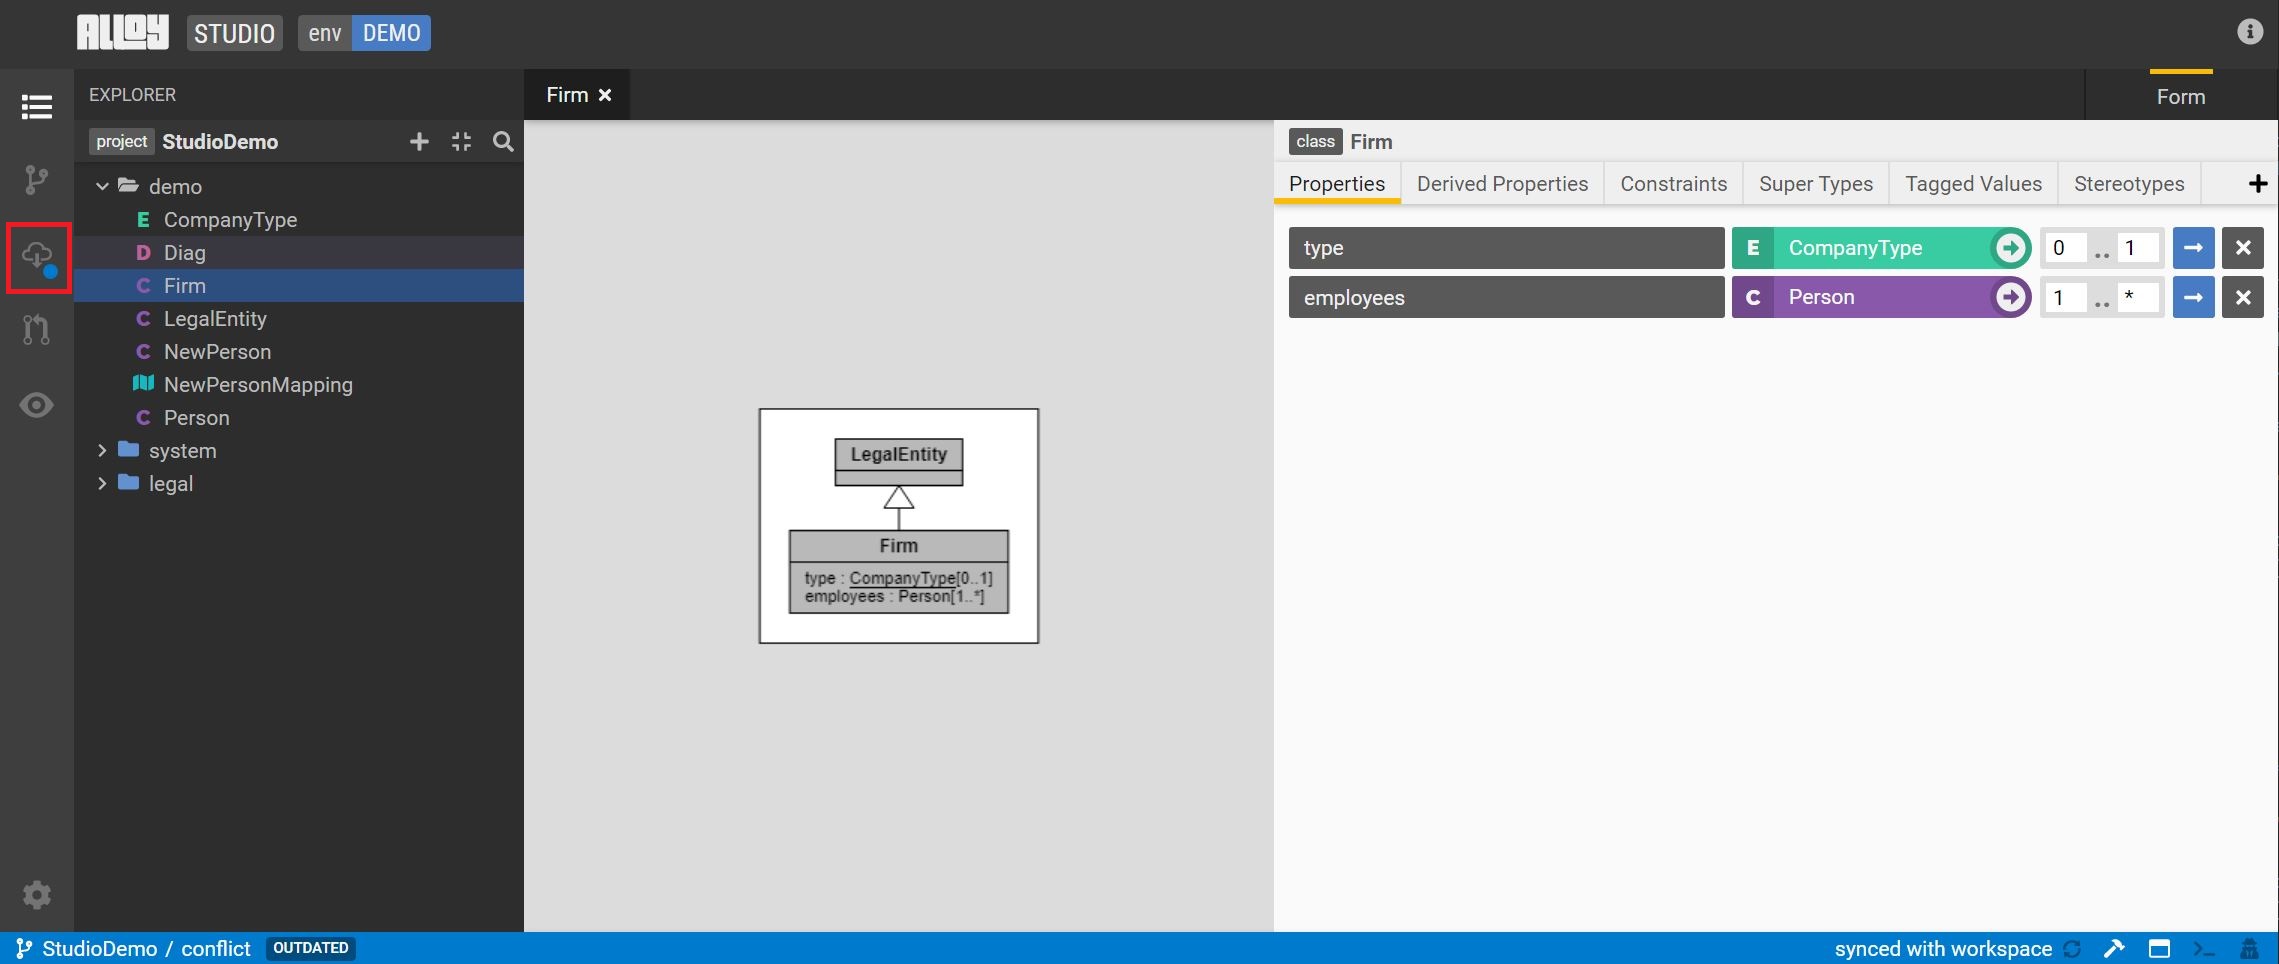
Update workspace with latest changes
When the workspace is out of date, Studio provides a notification in the status bar on the bottom left. Click the update button on the sidebar to bring in the latest changes.
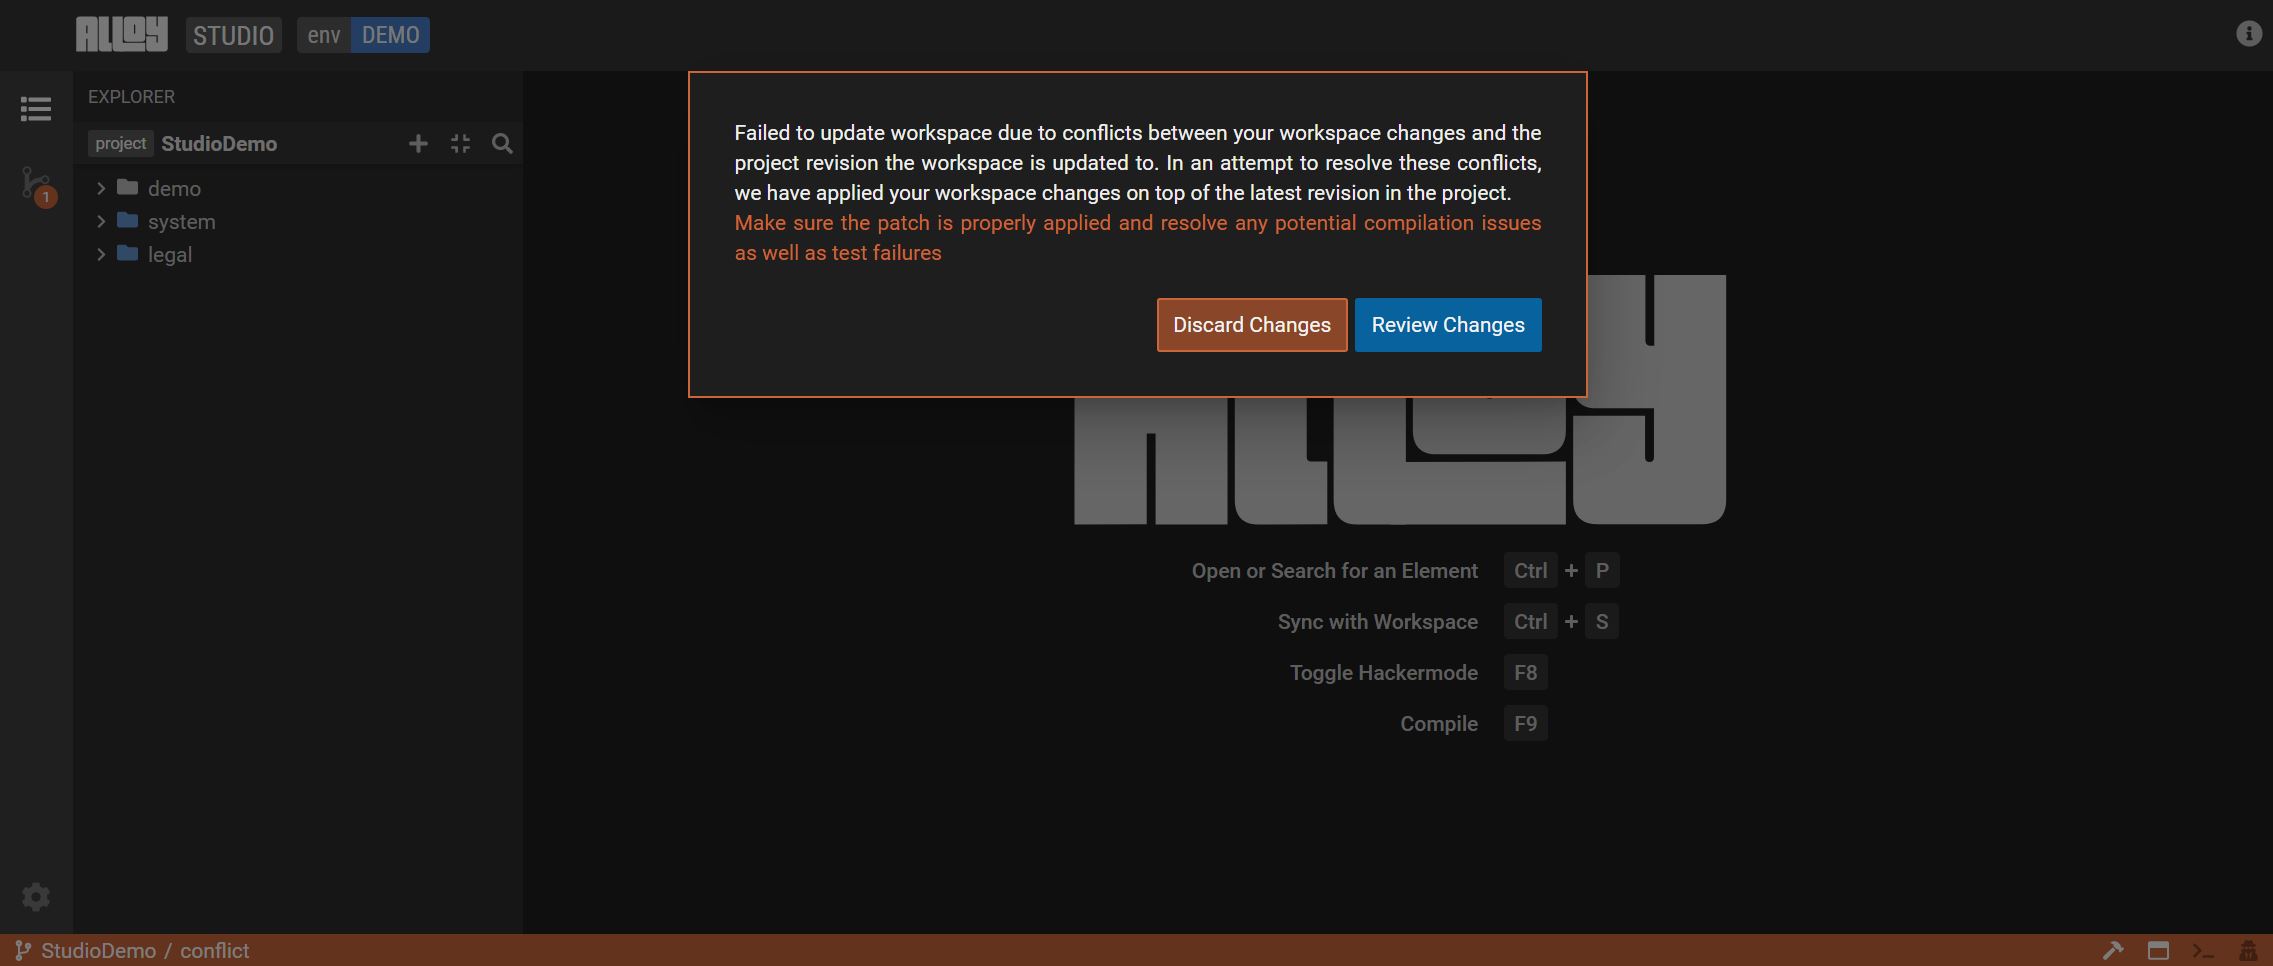
Resolve a conflict in the workspace
A workspace update may result in a conflict. Studio will open a new view to aid in resolving the conflict.
-
Choose one of the following actions:
-
Discard the changes: the workspace changes are removed.
-
Review the changes: the workspace changes will be applied on top of the latest version.
-
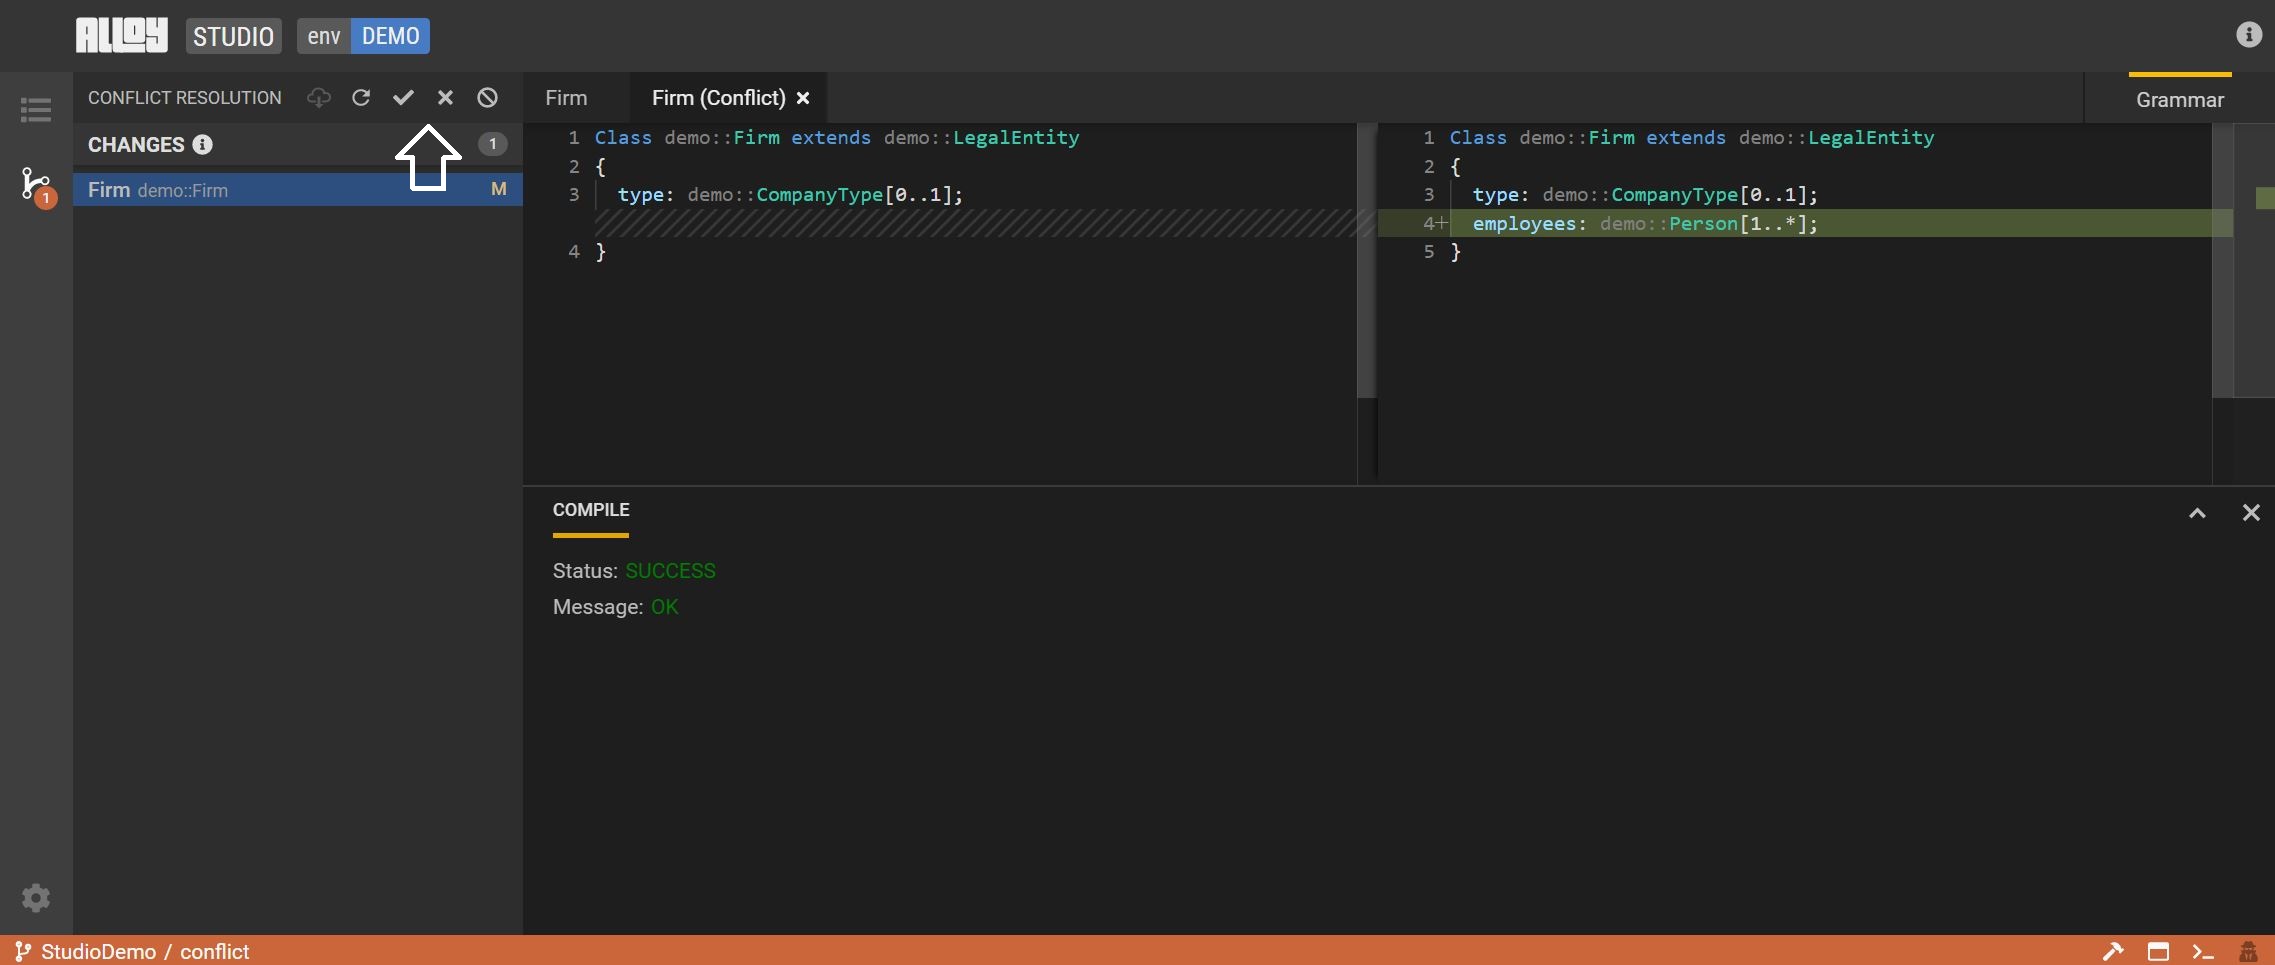
-
If you chooose to review changes, review and press
F9to compile. -
Once the changes compile successfully, either accept or discard the changes.
Define project dependencies
When you add a dependency, all its dependencies are included as well. For example, if model $A$ creates a dependency on "Listed Product", and "Listed Product" depends upon the "Foundation" model, you do not need to add a separate dependency to Foundation for model $A$ to depend on it. The dependency is already included in your dependency to other projects.
Dependency version control
COMING SOON
Frequently Asked questions
COMING SOON
File Generation
File generation lets you generate your models in other codes or schemas.
Creating a File Generation
COMING SOON